
Course Overview
Par: 71
Yardage: 7229 | 6721 | 6365 | 5543
Through the use of “width that matters” and strategic placement of features, this Tom Doak design delivers an outstanding experience to all levels of golfers. From the raw beginner, to the most skilled player, CommonGround Golf Course has been designed to maximize the enjoyment of the game for everyone. Although located in the heart of the city, the urban sprawl surrounding the course is unnoticeable, and the breathtaking views of the majestic front range of Colorado are a site to behold. With a commitment to tradition and excellence, Tom Doak and Renaissance Golf Design have created a masterpiece for the ages that is easy to walk, worthy of the highest level of competition, and most importantly fun to play.
Hole #1
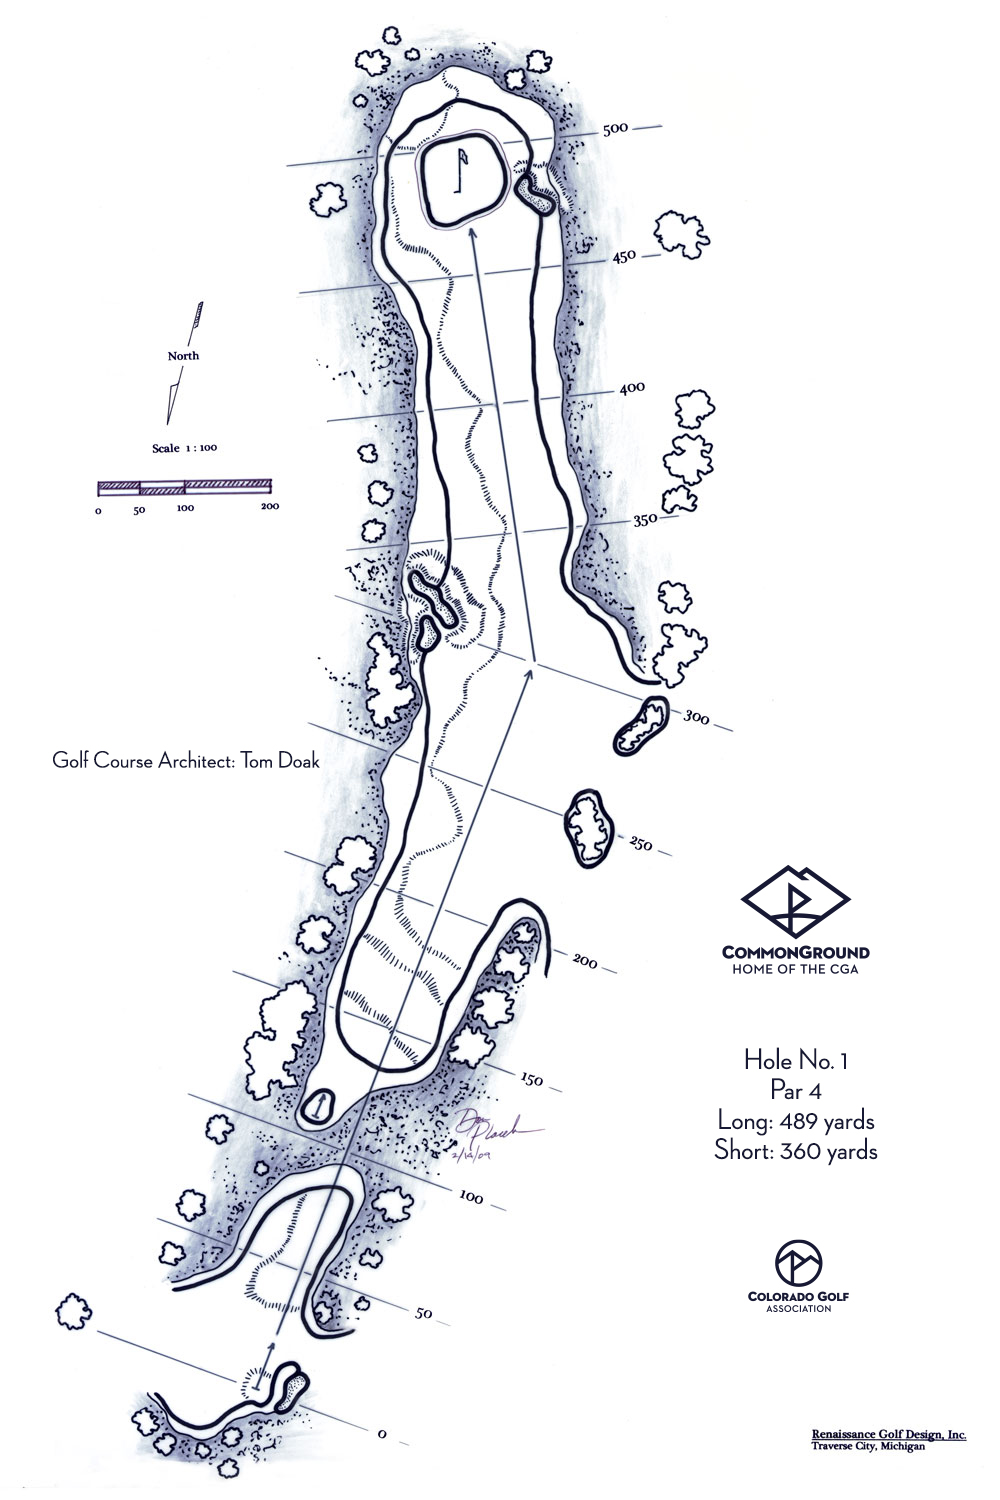
Hole #1 - Par 4
Although long, the opening hole provides plenty of fairway to aim at off the tee. Your best angle of attack on your approach shot will be from the left side of the fairway, but be careful of the fairway bunkers protecting that side. With no bunkers protecting the front of the green, players will have the option of flying or running their approach shot onto the green. Once on the green, players will face a variety of breaking putts depending on the hole location of the day.
| Black | Yellow | White | Red |
| 489 | 443 | 425 | 360 |
Hole #2
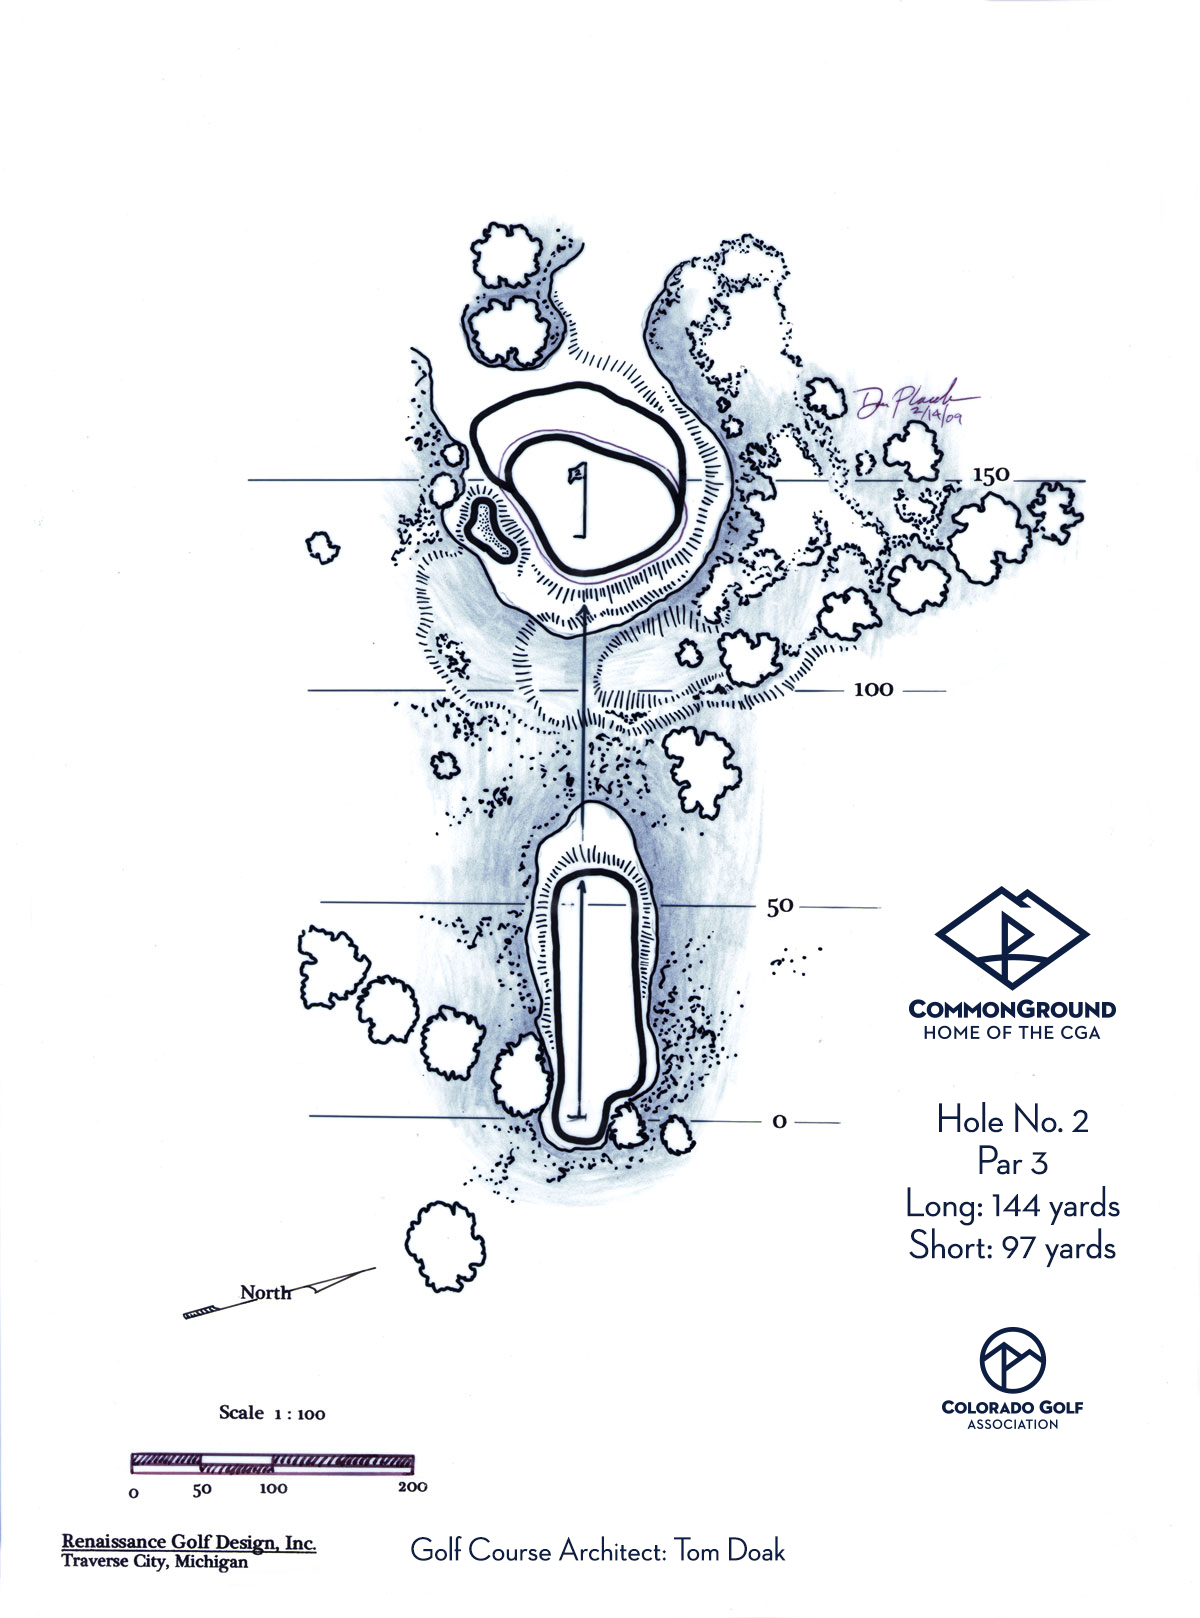
Hole #2 - Par 3
Although the second hole is the shortest hole on the course, it is by no means easy. While treated to a spectacular view of downtown Denver, players will face a tee shot to a pushed-up green complex with a dangerous hazard to the right of the green. Once on the green, players will be looking at one of the flatter greens that the course has to offer.
| Black | Yellow | White | Red |
| 144 | 127 | 112 | 97 |
Hole #3

Hole #3 - Par 5
As the first par 5, the third hole provides players plenty of options to choose from as they navigate the hole. Off the tee, players will be given the option of trying to carry a narrow cross bunker on the left or playing safe by aiming toward the right side of the fairway. Although unreachable by most players on the second shot, the hole begs you to swing away and hit it as hard as you can. Be careful though, as a couple of strategically placed fairway bunkers can mean the difference between a birdie opportunity and double bogey. The approach shot will call for a short club into one of the most interesting green complexes on the course. Inspired by the “punch bowl” green at Chicago Golf Club, the green on the third hole is hidden with a carefully thought out mounding complex surrounding the entire green. Once safe on the green, players will face one of the tougher greens on the golf course.
| Black | Yellow | White | Red |
| 586 | 555 | 535 | 498 |
Hole #4

Hole #4 - Par 4
Standing on the elevated tee of the fourth hole, players will be forced to decide how much of the dogleg left that they want to bite off. Although not a hazard, if a player fails to carry the native ravine they will be faced with a blind shot out of native grass. The approach shot calls for an accurate iron shot, as the green is narrow and is designed with a couple of obvious plateaus that a player will want to hit if they hope to ensure a two putt.
| Black | Yellow | White | Red |
| 424 | 397 | 380 | 301 |
Hole #5
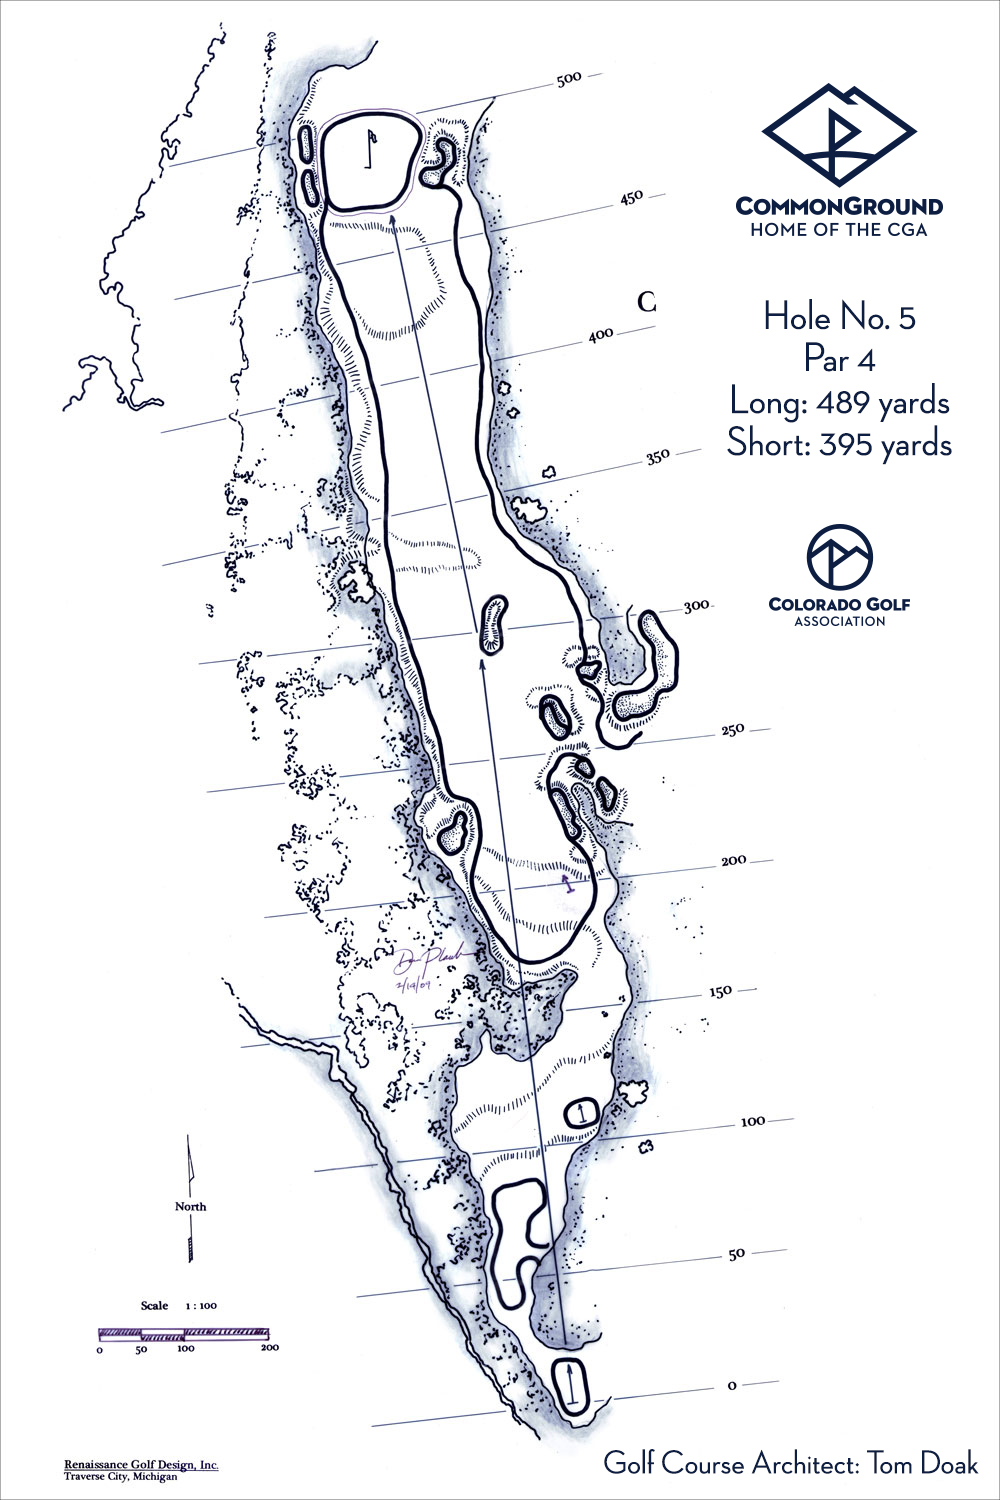
Hole #5 - Par 4
Standing on the tee of the fifth hole, players will find it hard to believe they are in the middle of the city as they gaze down the fairway of this long par 4. With 110 acres of protected wetland running the length of the hole on the left side, a long tee shot down the right side will give players the best opportunity of making par. Be careful not to bail too far right, as hole 5 shares a treacherous bunker complex with hole 13. The second shot will call for a long iron, if not a fairway wood to get home. With no bunkers protecting the front of the largest green on the golf course, every caliber of golfer should have an opportunity to hit this hole in regulation with two well struck shots. Once on the 11,000 square foot green, players will hope they hit it near the flagstick, otherwise 4 putting will be a definite possibility!
| Black | Yellow | White | Red |
| 489 | 440 | 407 | 395 |
Hole #6
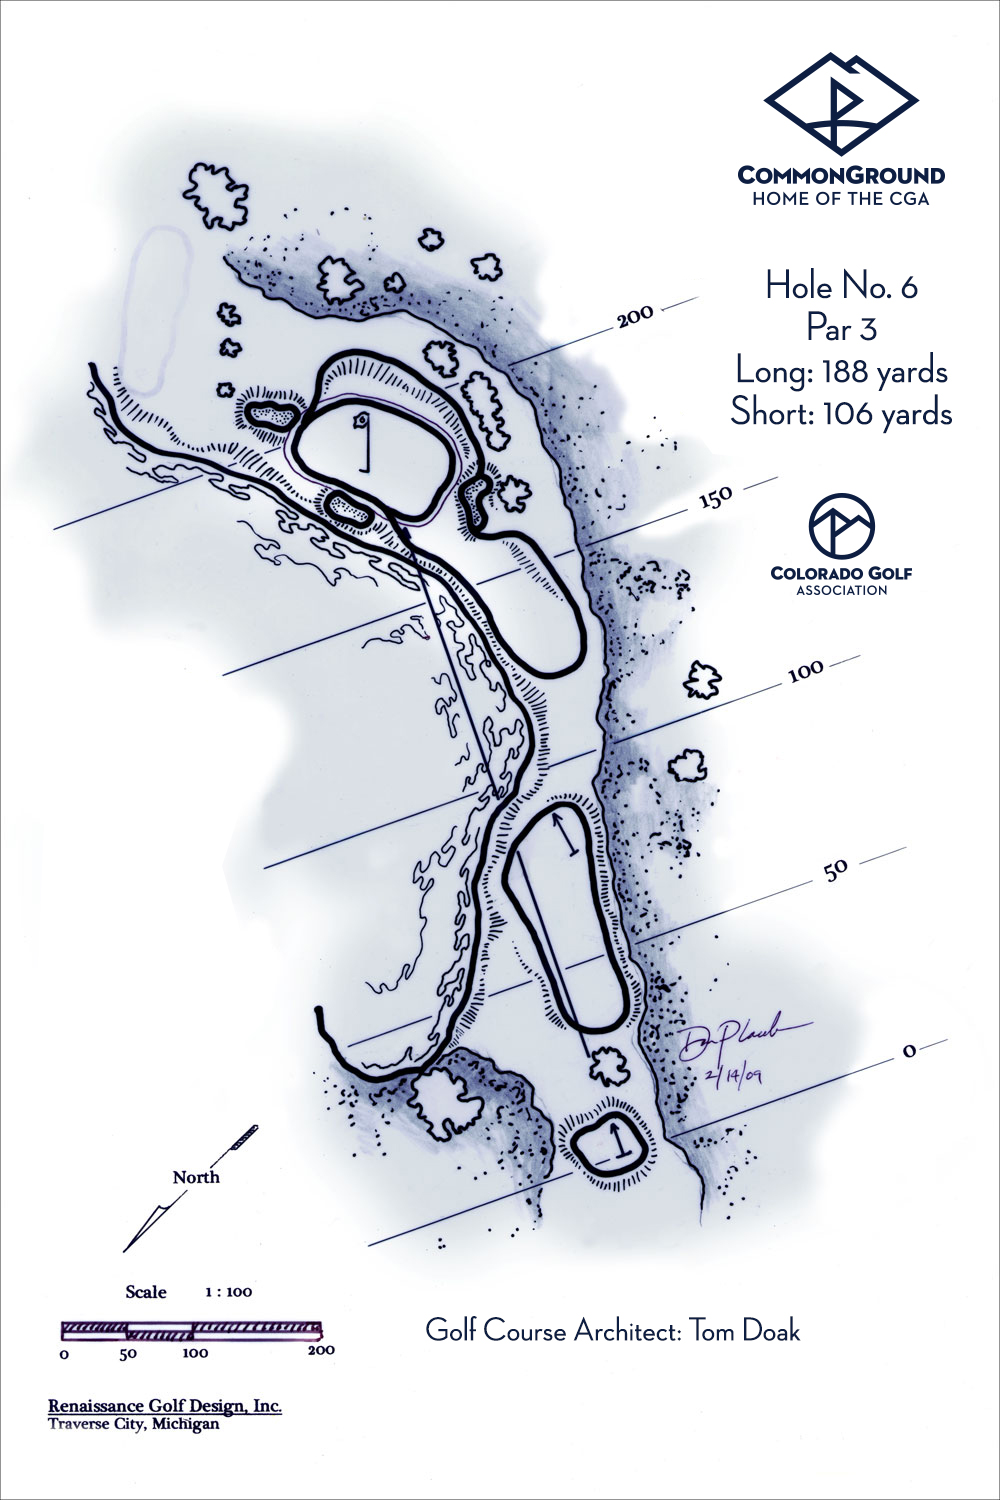
Hole #6 - Par 3
Do you remember Tiger Woods’ chip in on hole 16 at the 2005 Masters? Well, the sixth hole at CommonGround will give players the chance to relive that shot themselves. From tee to green, players will realize a strong resemblance to the famous par 3 at Augusta. Although not a long hole, the tee shot calls for a carry over water to a slightly elevated green with a monster right to left ridge running right down the center. Players will need to make sure to keep their focus throughout this hole to avoid a big number on a relatively short hole.
| Black | Yellow | White | Red |
| 188 | 147 | 125 | 106 |
Hole #7
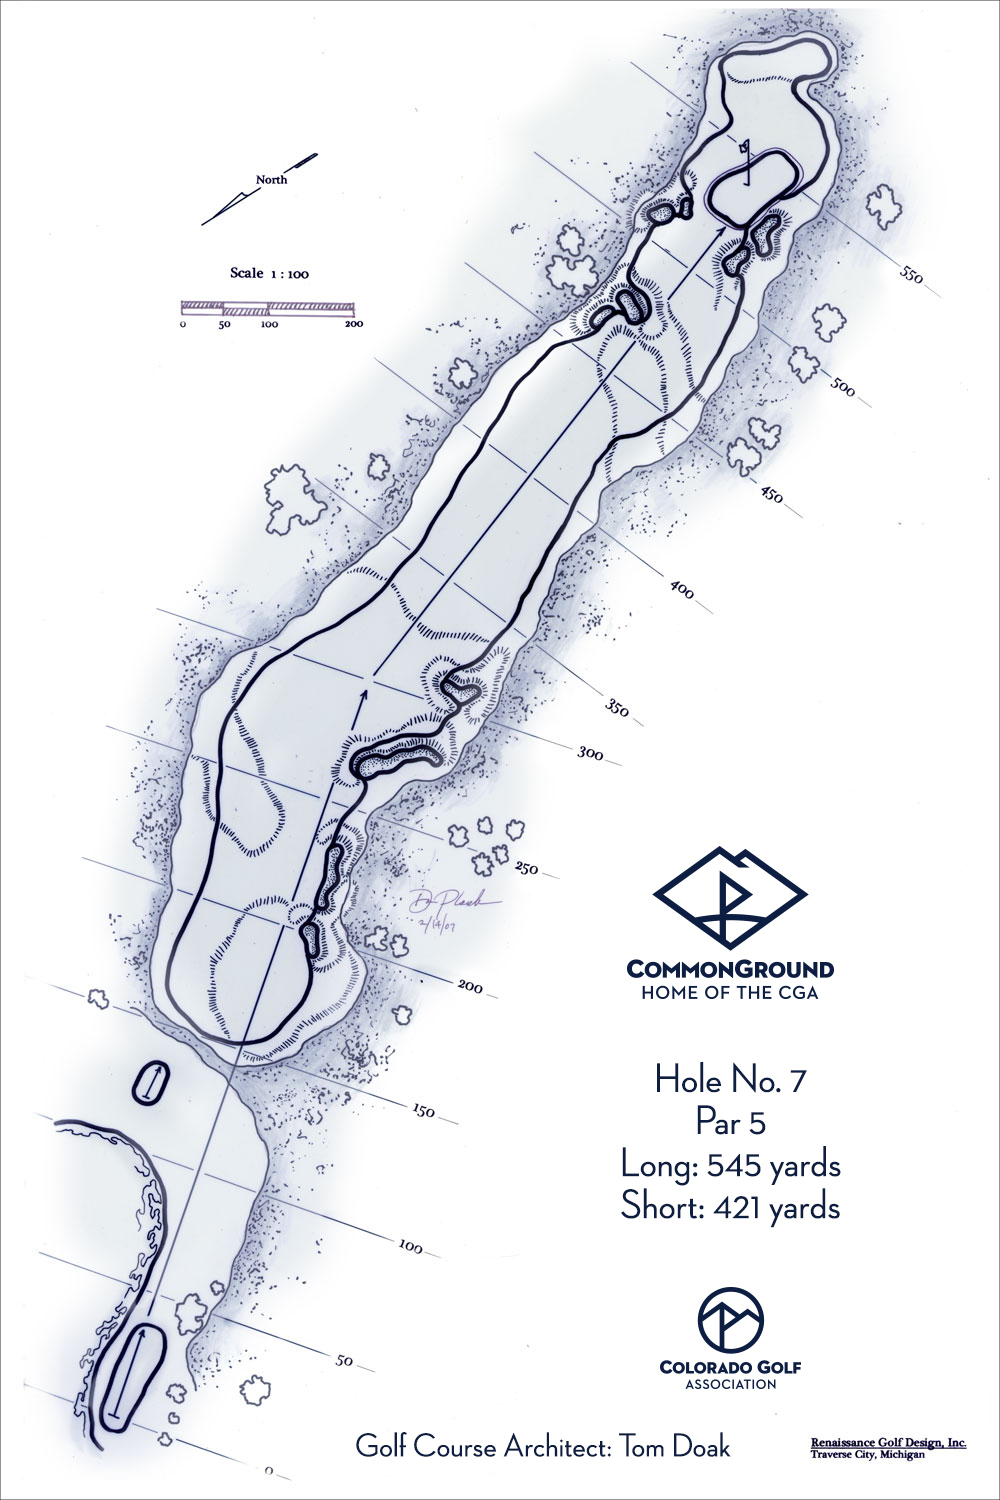
Hole #7 - Par 5
The seventh hole is one of the better scoring opportunities at CommonGround. Flanked on the right by Doak’s favorite bunker complex on the course, this short par 5 is reachable in two by a large number of golfers. The closer a player can challenge the bunkers without going in will exponentially reward them with the best angle and shortest shot if they want to attempt going for it. Be careful when attempting to get home, as a depression with a dangerous fairway bunker awaits those who fail to clear the obstacle. Although short, don’t automatically assume you will make birdie or par. The green is the smallest green on the course, and will take some skill to hit.
| Black | Yellow | White | Red |
| 545 | 527 | 513 | 421 |
Hole #8
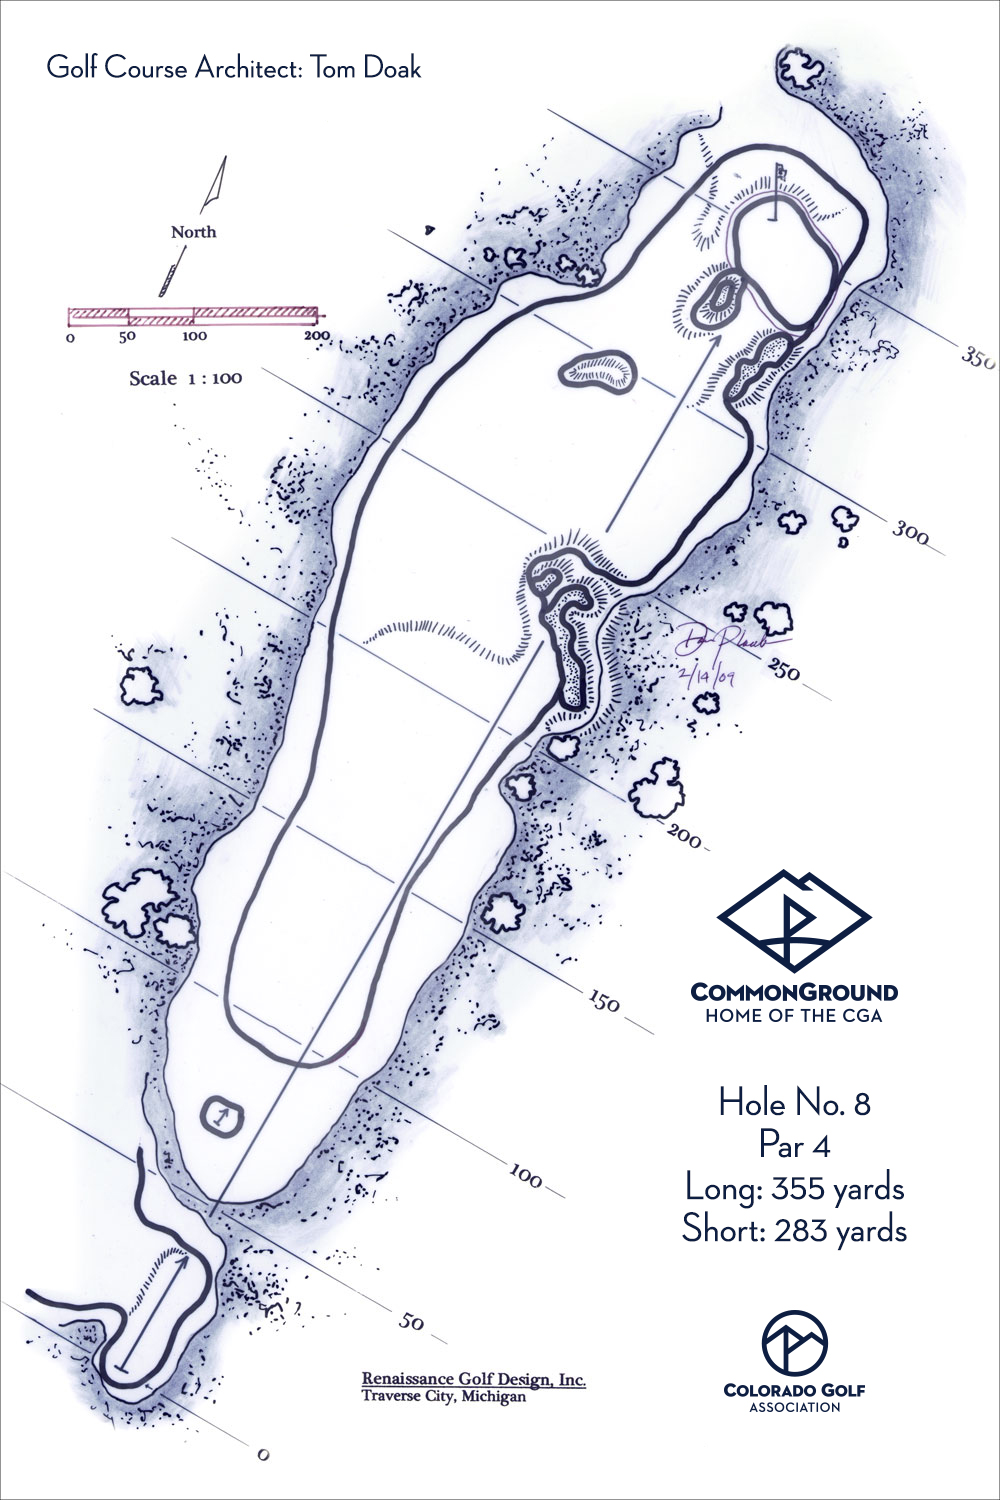
Hole #8 - Par 4
Hole 8 is a staff favorite. With nothing to work with, Doak and his team were able to create one of the most interesting and fun holes to play on the golf course. With the tee boxes located just paces from the seventh green, players will have to make a decision on whether to try and carry the massive cross bunker on the right, or play safely and aim left. Either decision will leave a short iron in the player's hand for the approach shot, but better players will relish the angle of approach they will receive by carrying the bunker. The green is protected by bunkers on both the left and the right, and the front of the green is actually a false front which will return balls back to the fairway if not hit far enough on to the green. Although not overdone in undulations, the green provides plenty of thought and respect when trying to hole out for birdie.
| Black | Yellow | White | Red |
| 355 | 337 | 324 | 283 |
Hole #9
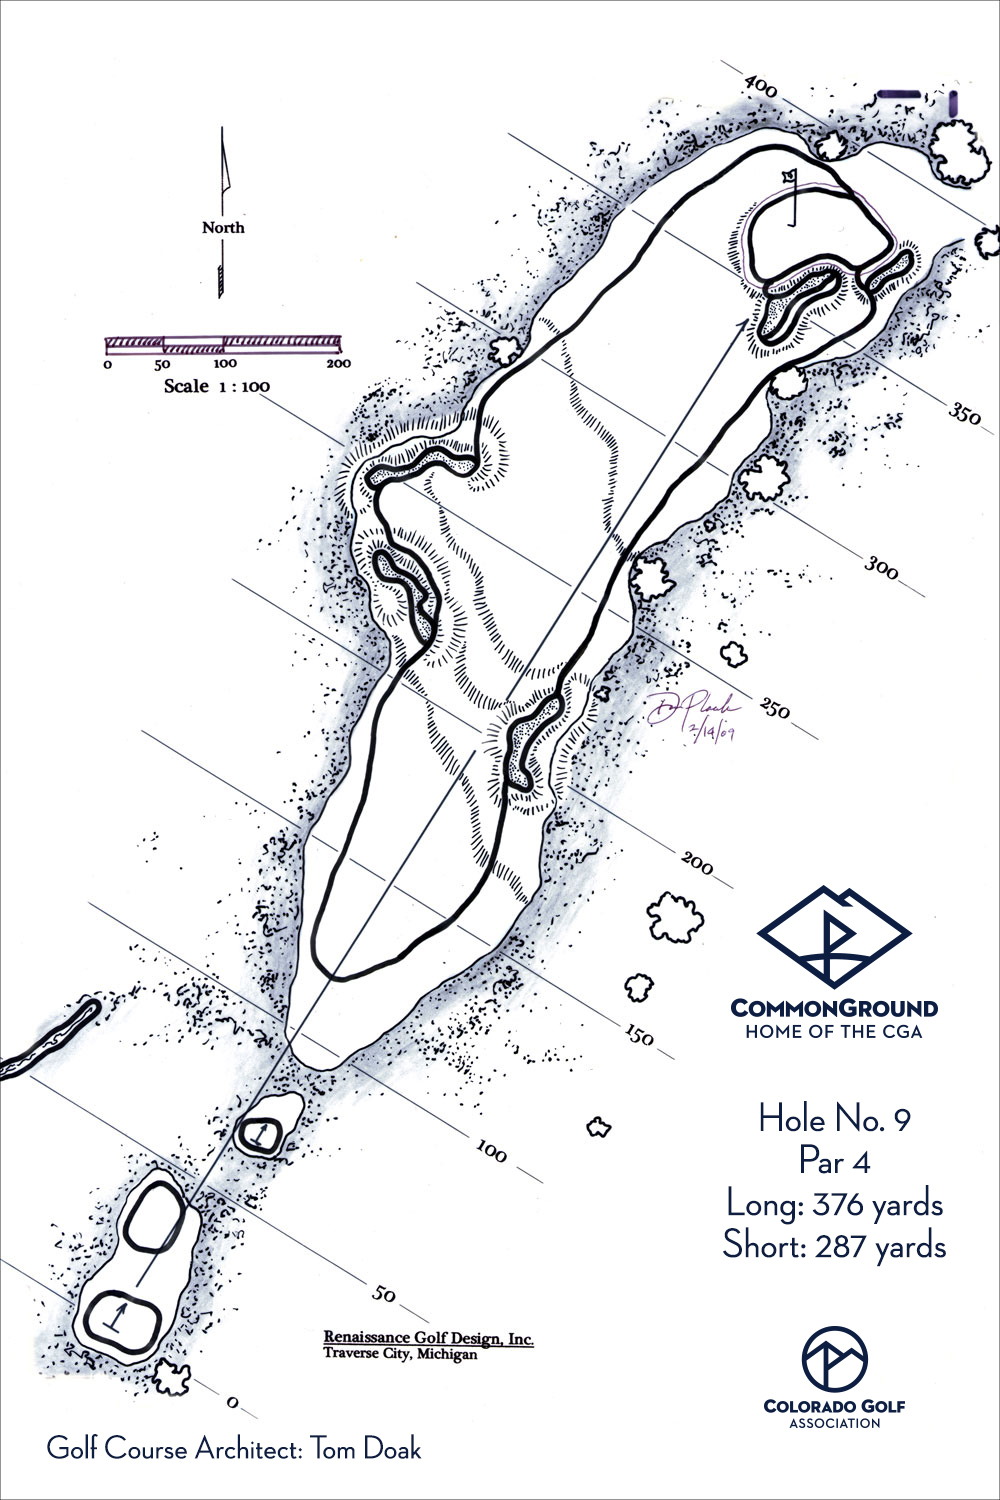
Hole #9 - Par 4
The closing hole of the front nine is an uphill par 4 that places a premium on accuracy rather than distance. With bunkers guarding both sides of the fairway, players will be well rewarded by hitting a solid tee shot down the dead center of the fairway giving them a good look at the green. With a short to mid iron in hand, an accurate approach shot is mandatory for players hoping to make par or better. Players able to navigate the greenside bunkers will be faced with a number of tricky putts on this back to front sloping green.
| Black | Yellow | White | Red |
| 376 | 368 | 331 | 287 |
Hole #10
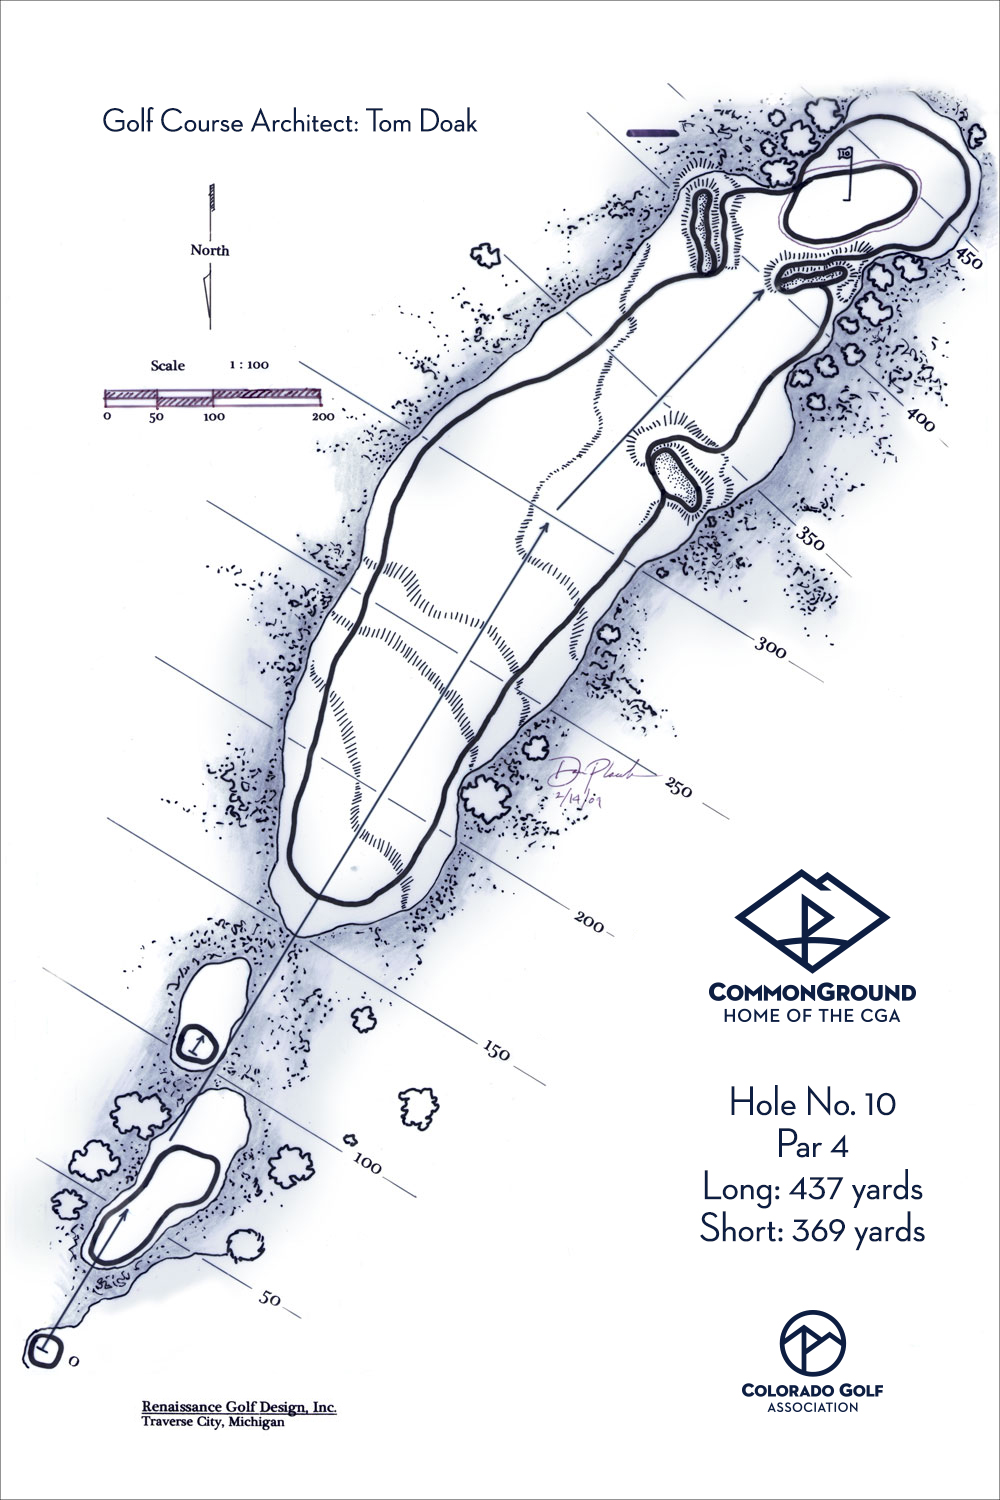
Hole #10 - Par 4
The back nine begins with the demanding downhill par 4 tenth hole. The optimum tee shot will call for a gentle fade to set the player up for the tricky approach shot into a well protected green. Standing on a downhill lie, players will face an approach shot to narrow green tucked within a stand of pine trees and two greenside bunkers.
| Black | Yellow | White | Red |
| 437 | 398 | 385 | 369 |
Hole #11
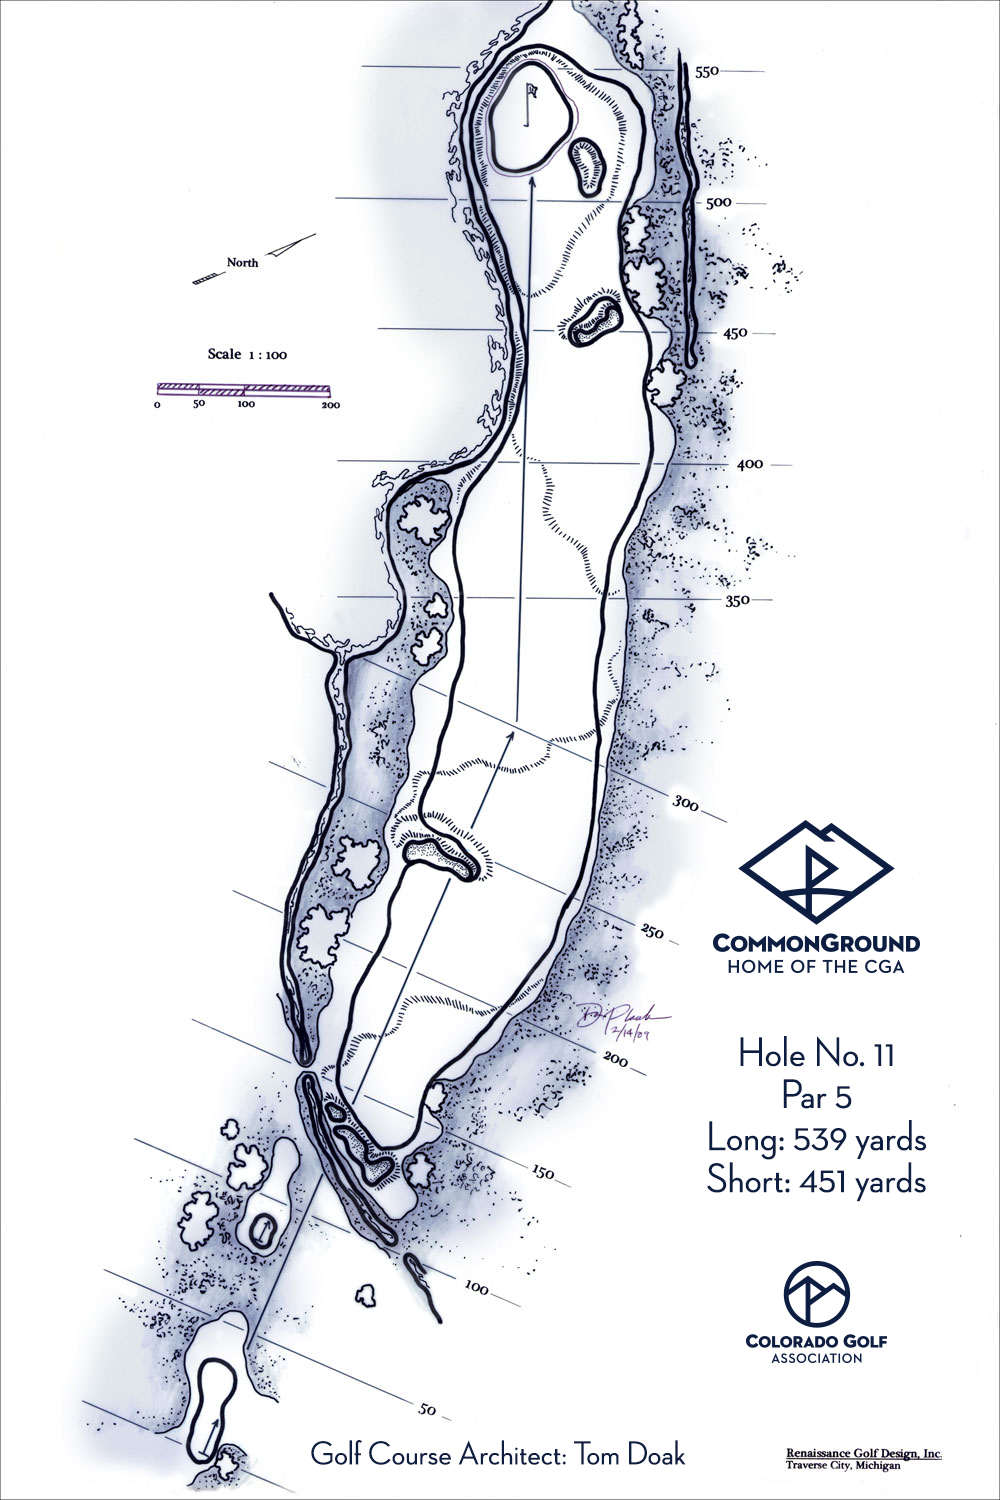
Hole #11 - Par 5
The first thing players will notice on the eleventh hole is two fairway bunkers with massive faces that will need to be avoided at all costs with the tee shot. Although intimidating, there is plenty of fairway to the right of the second bunker. Being a reachable par 5, the risk reward factor of going for the green in two will need to be weighed carefully. With a lake protecting the left and back of the green, and a bunker and trees to the right, a well positioned lay-up is the smart play. Most players will have a short iron in hand for the approach shot, and if played correctly, the hole should yield plenty of birdies.
| Black | Yellow | White | Red |
| 539 | 515 | 500 | 451 |
Hole #12
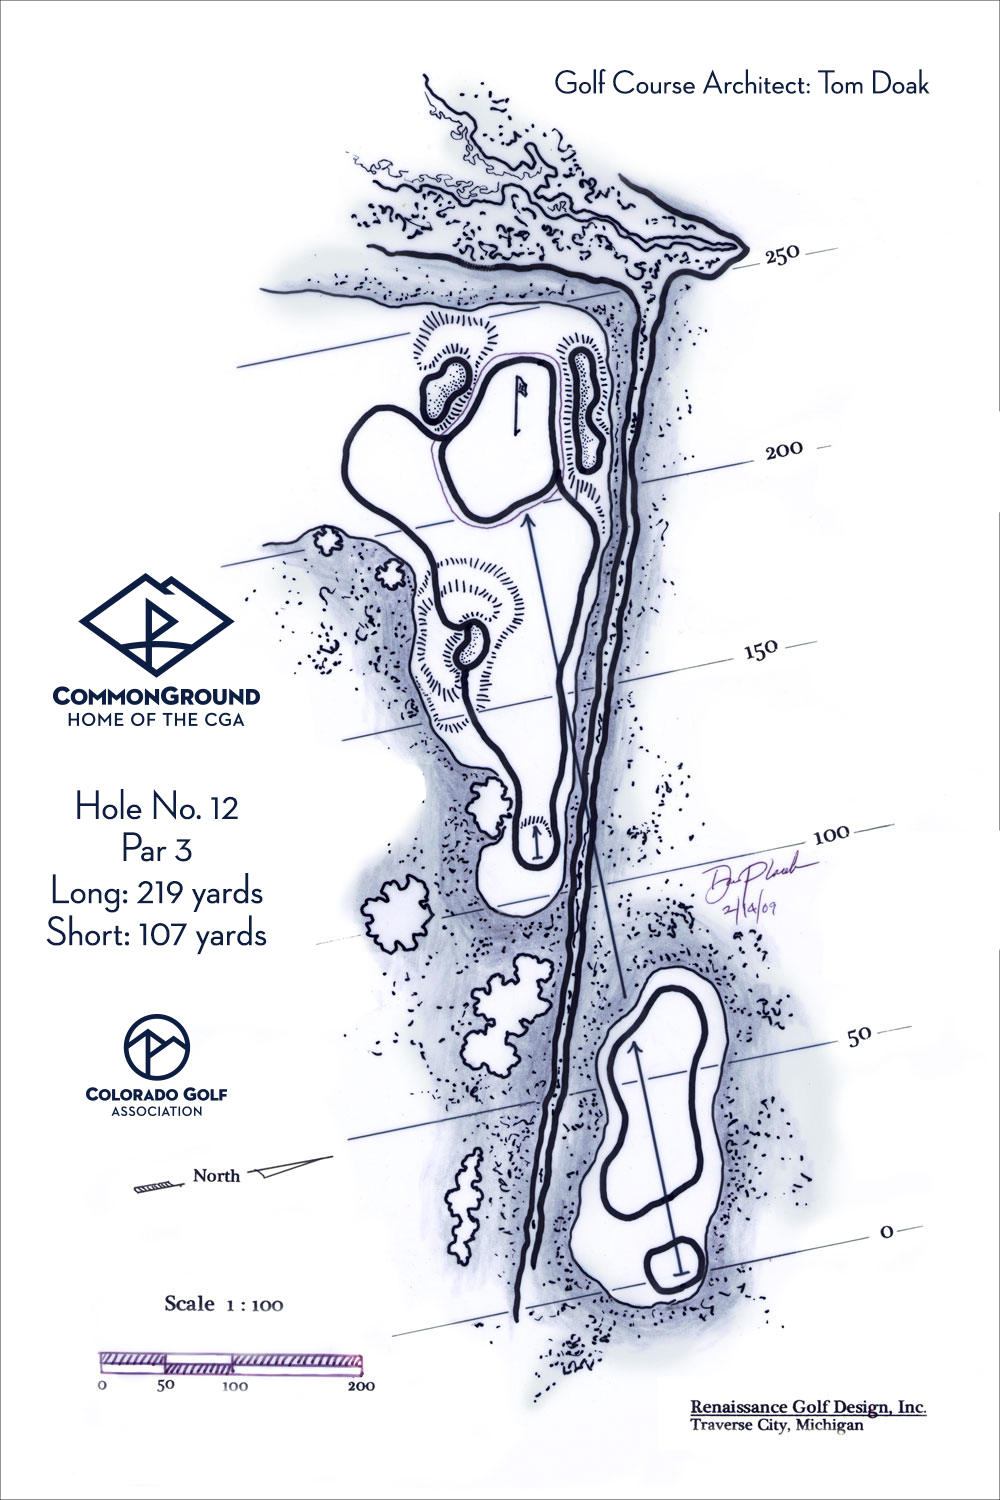
Hole #12 - Par 3
Routed directly towards Mt. Evans, this beautiful par 3 will provide players with a spectacular panoramic view of the Front Range. For most players, the tee shot will call for a carry over a creek to the green which is tucked at the edge of the wetlands. With bunkers and hazard surrounding all but the front of the green, the tee shot should not be taken lightly. Once on the oversized green, players will face a variety of undulations and slopes as they try to hole their putt.
| Black | Yellow | White | Red |
| 219 | 191 | 168 | 107 |
Hole #13

Hole #13 - Par 4
With a complex of bunkers on the right side, the ideal tee shot on the thirteenth will be down the left center of the fairway. Players will want to avoid hitting their drive too far and end up in a well placed bunker in the left side of the fairway. Most players will have a short or mid iron in hand for their approach shot into the retro designed push up green with a false front. The green is surrounded by bunkers on three sides, but the open front is a false front. The challenge lies in actually hitting the green and not leaving oneself with a difficult up and down.
| Black | Yellow | White | Red |
| 417 | 408 | 395 | 353 |
Hole #14

Hole #14 - Par 3
With visions of Scotland, the fourteenth hole was designed with a large mound obscuring the view of the right side of the green. Although intimidating, the mound was designed to provide an “alley” like approach to the green. With no bunkers on the hole, players can take aim at the green knowing that their second shot will be off grass regardless where they end up. With the green sloping away from play, and plenty of undulations, the fourteenth green offers one of the more interesting and challenging greens on the golf course.
| Black | Yellow | White | Red |
| 229 | 179 | 169 | 141 |
Hole #15
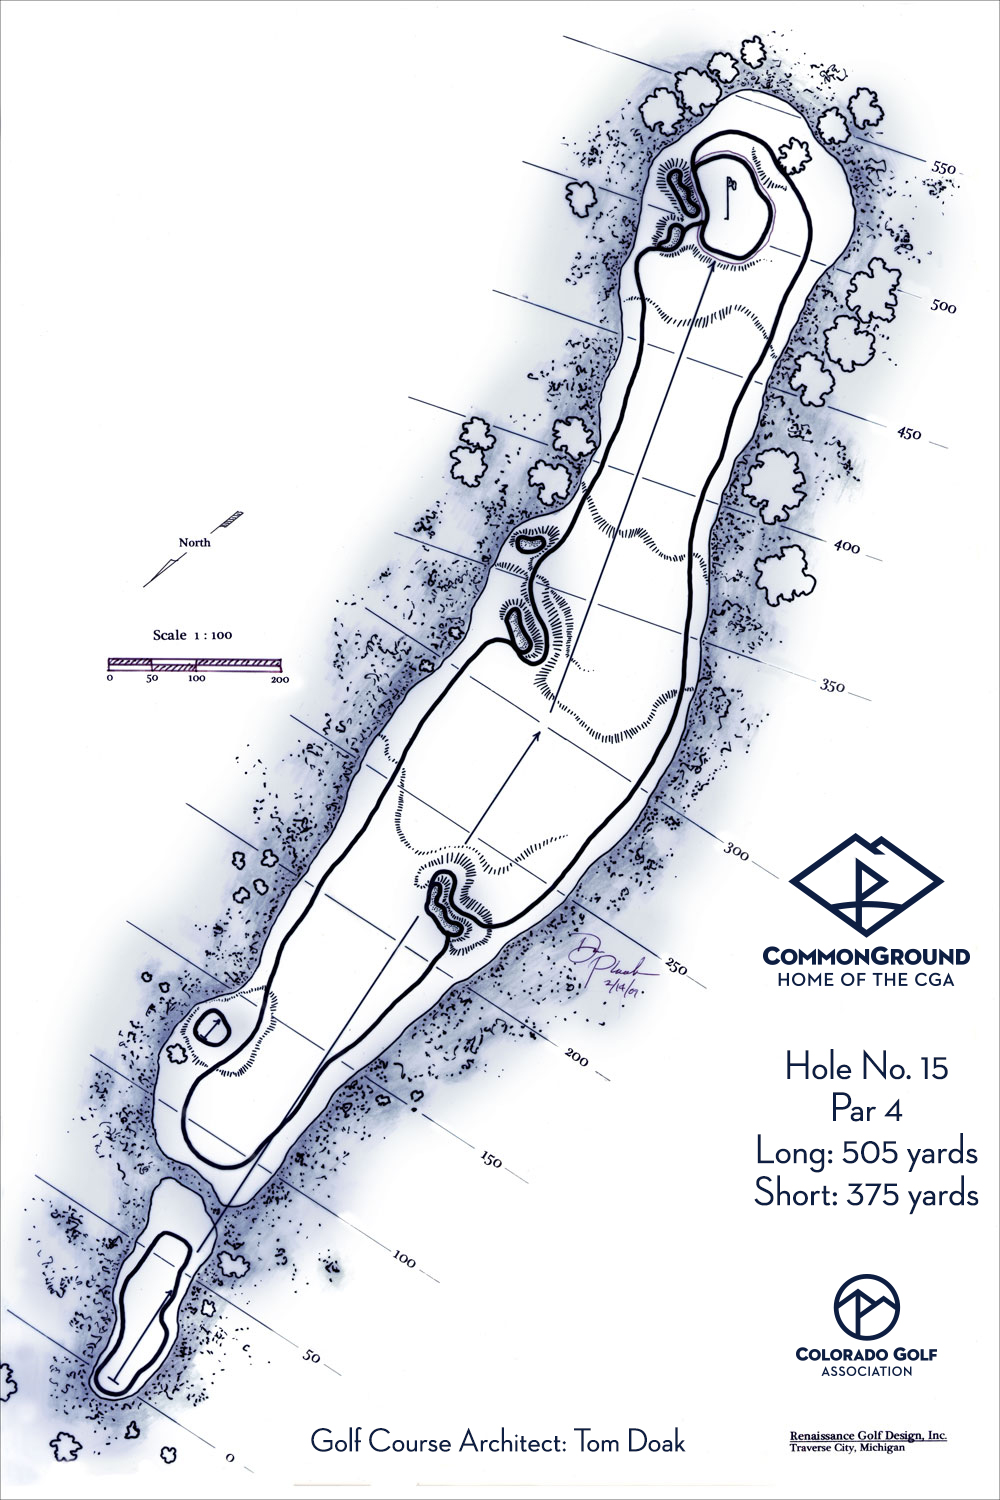
Hole #15 - Par 4
Bring everything you got to the challenging fifteenth hole. This long, uphill par 4 will test the best of players. Although the hole provides plenty of width, two well situated bunkers promise to derail many good rounds of golf heading into the hole. The first bunker is a large pot bunker placed in the center of the fairway that many players will try to carry. The second bunker is a 12-foot deep bunker on the left side that provides a great view of the sky from the bottom. Assuming a player successfully places their tee shot in the middle of the fairway, the work has only begun and they will be faced with a long second shot to a two tiered green with bunker protection on the left.
| Black | Yellow | White | Red |
| 505 | 478 | 454 | 375 |
Hole #16
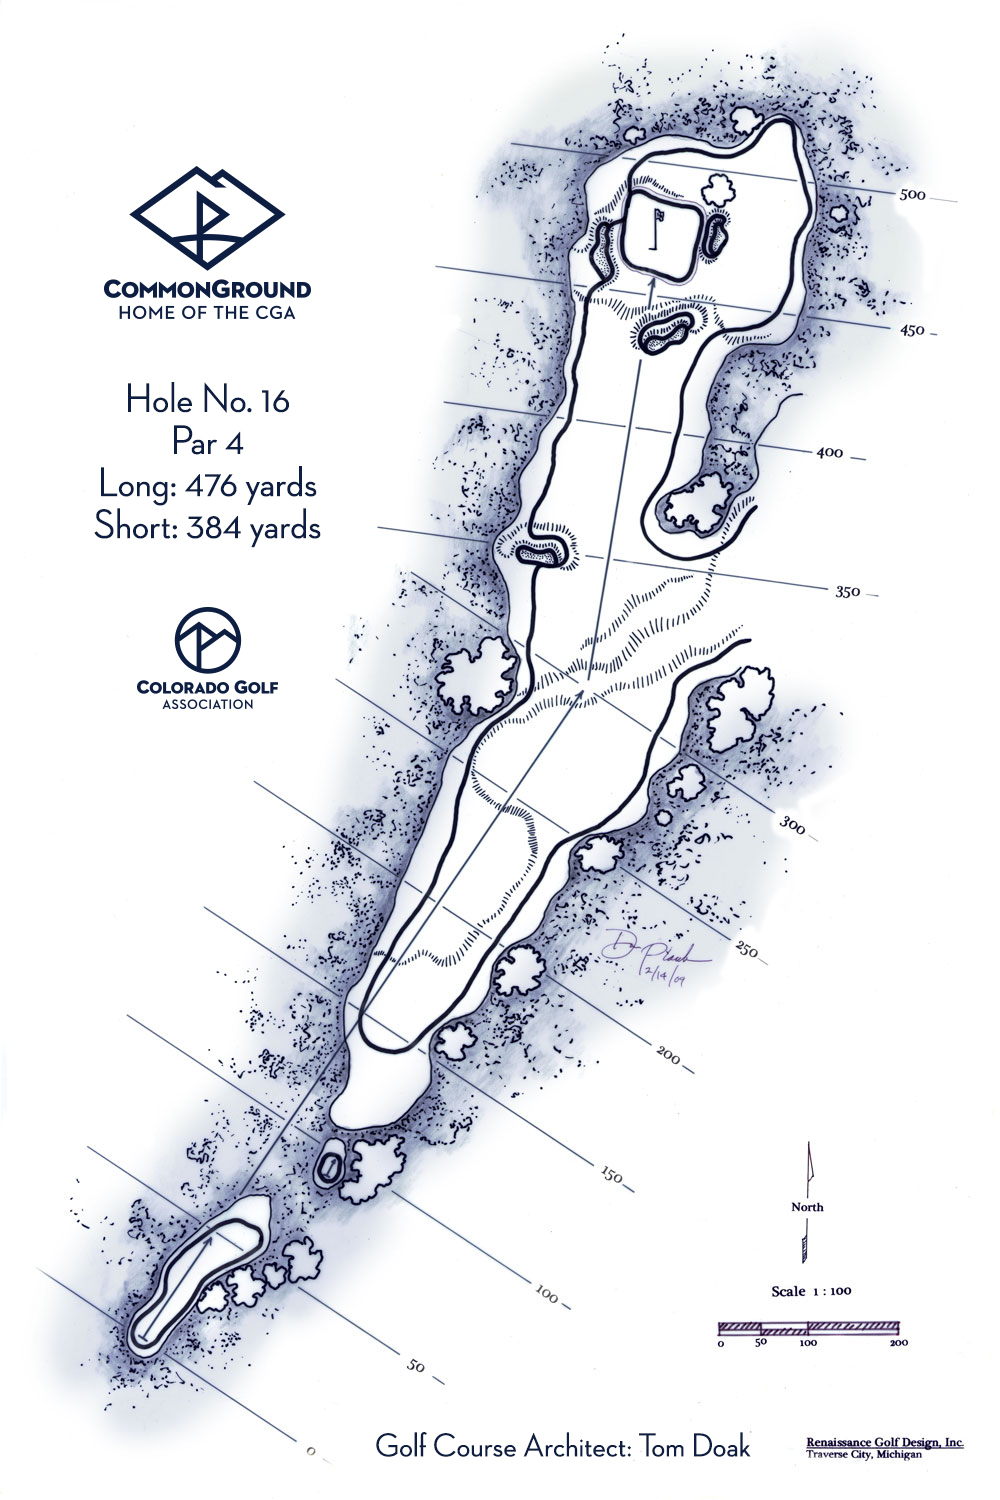
Hole #16 - Par 4
The sixteenth is another staff favorite. Designed around a number of large mature trees, this dogleg left par 4 is reminiscent of a classic parkland hole. The tee shot will require players to aim towards the right side of the fairway to avoid having to play their second shot around the cluster of 50’ oak trees on the left. Players will face a challenging downhill approach shot to a green surrounded by bunkers. Although not overly undulating, the green provides plenty of interesting lines and looks at the hole.
| Black | Yellow | White | Red |
| 476 | 456 | 428 | 384 |
Hole #17
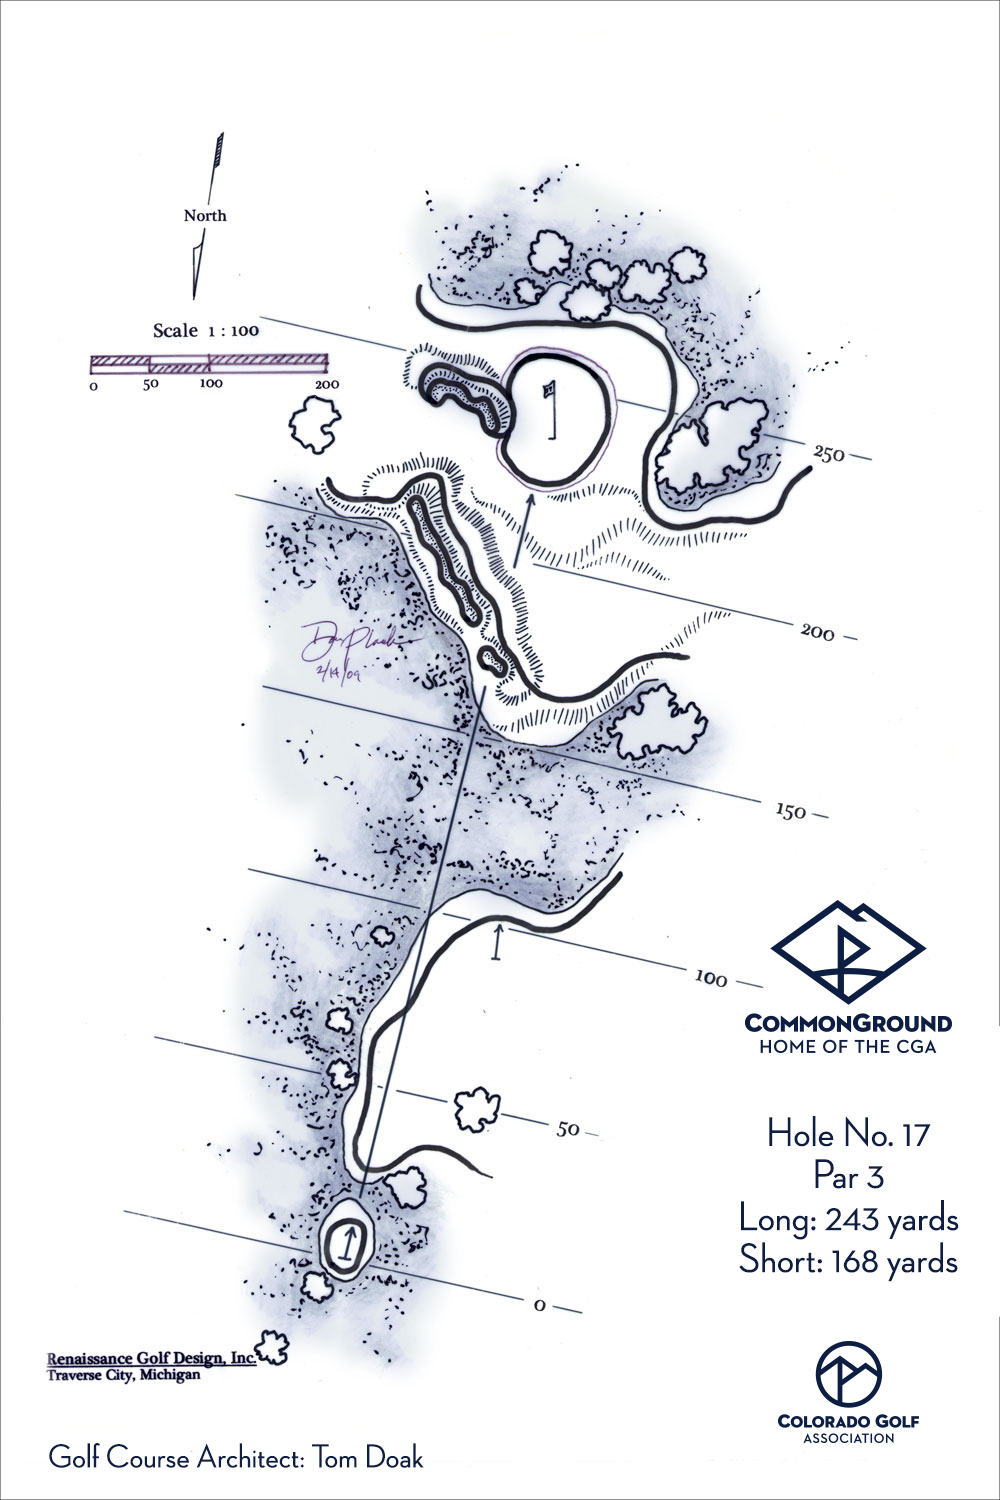
Hole #17 - Par 3
The long uphill seventeenth hole may well be the most challenging par 3 on the golf course. The upside down bowl shaped green, while free of bunkers directly in front, is framed with a visually stunning bunker complex on the left side and a stand of pine trees directly behind the green. Players will be well rewarded by knocking their tee shot close to the hole, as longer putts on this green are difficult to get down in two.
| Black | Yellow | White | Red |
| 243 | 216 | 187 | 168 |
Hole #18
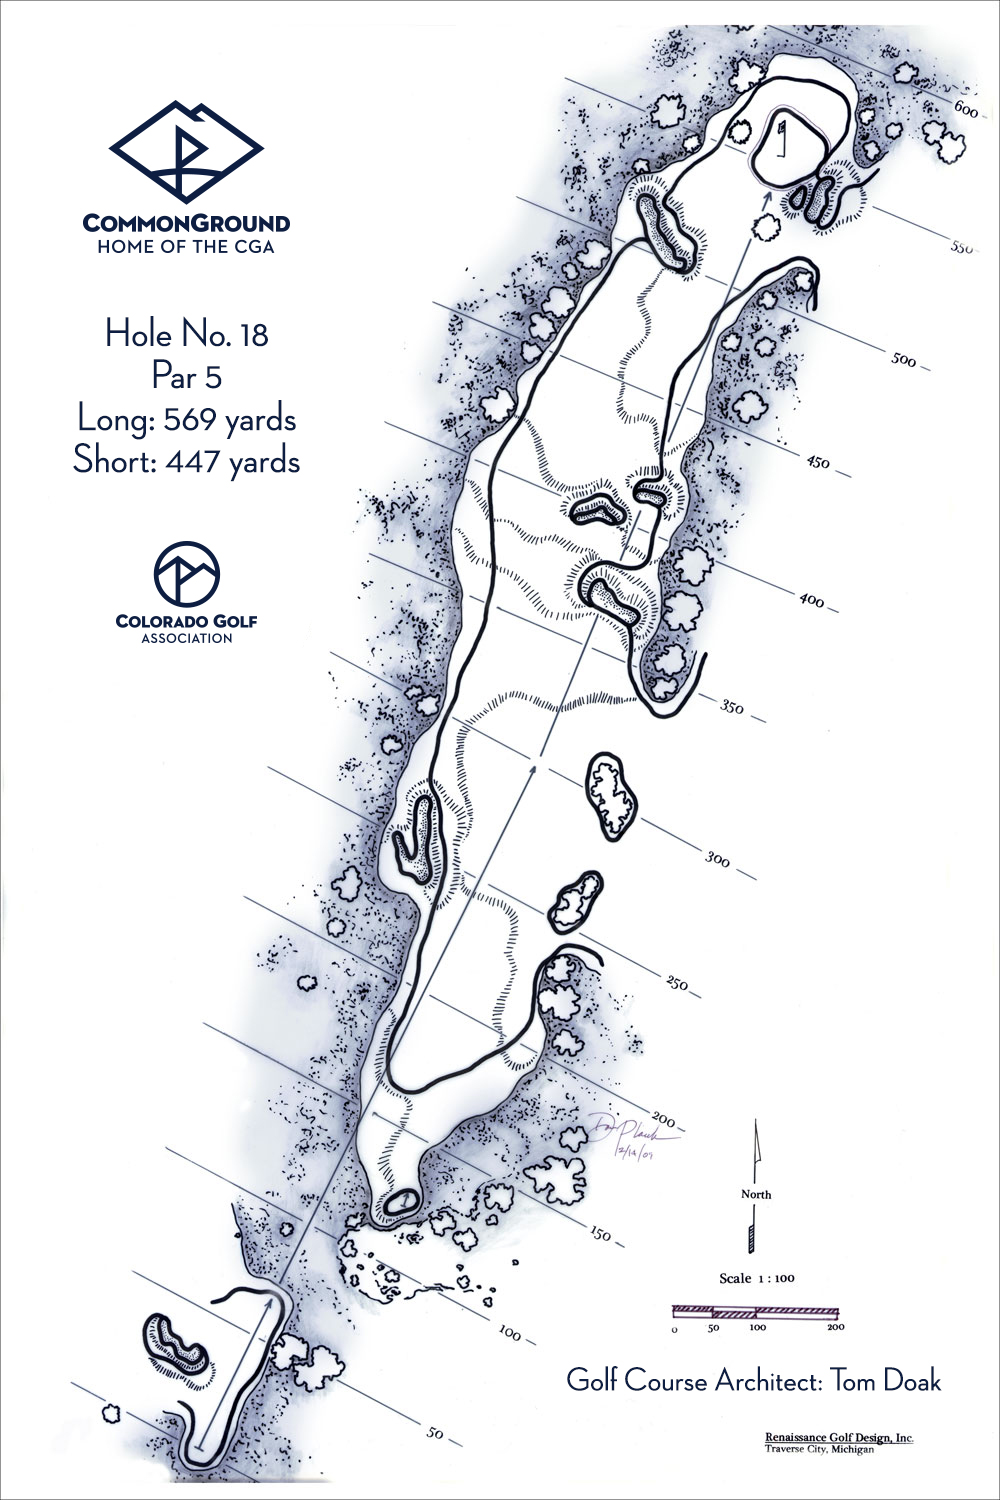
Hole #18 - Par 5
Perhaps the most interesting hole on the golf course, the par 5 finishing hole provides plenty of visual stimulation standing on the tee. Faced with a carry over native grasses, and tee boxes that orient players toward the left hand fairway bunker, players will have to make a conscious effort to make sure they aim their tee shot towards the fat part of the fairway. Players will face an intimidating second shot uphill to a blind landing area. The safe shot is to aim towards the left side of the fairway to ensure an unobstructed approach shot to the green. The green is relatively small, and players who play the hole correctly will have a good chance of finishing with birdie.
| Black | Yellow | White | Red |
| 568 | 539 | 527 | 447 |